
Views: 0 Author: Site Editor Publish Time: 2026-10-20 Origin: Site
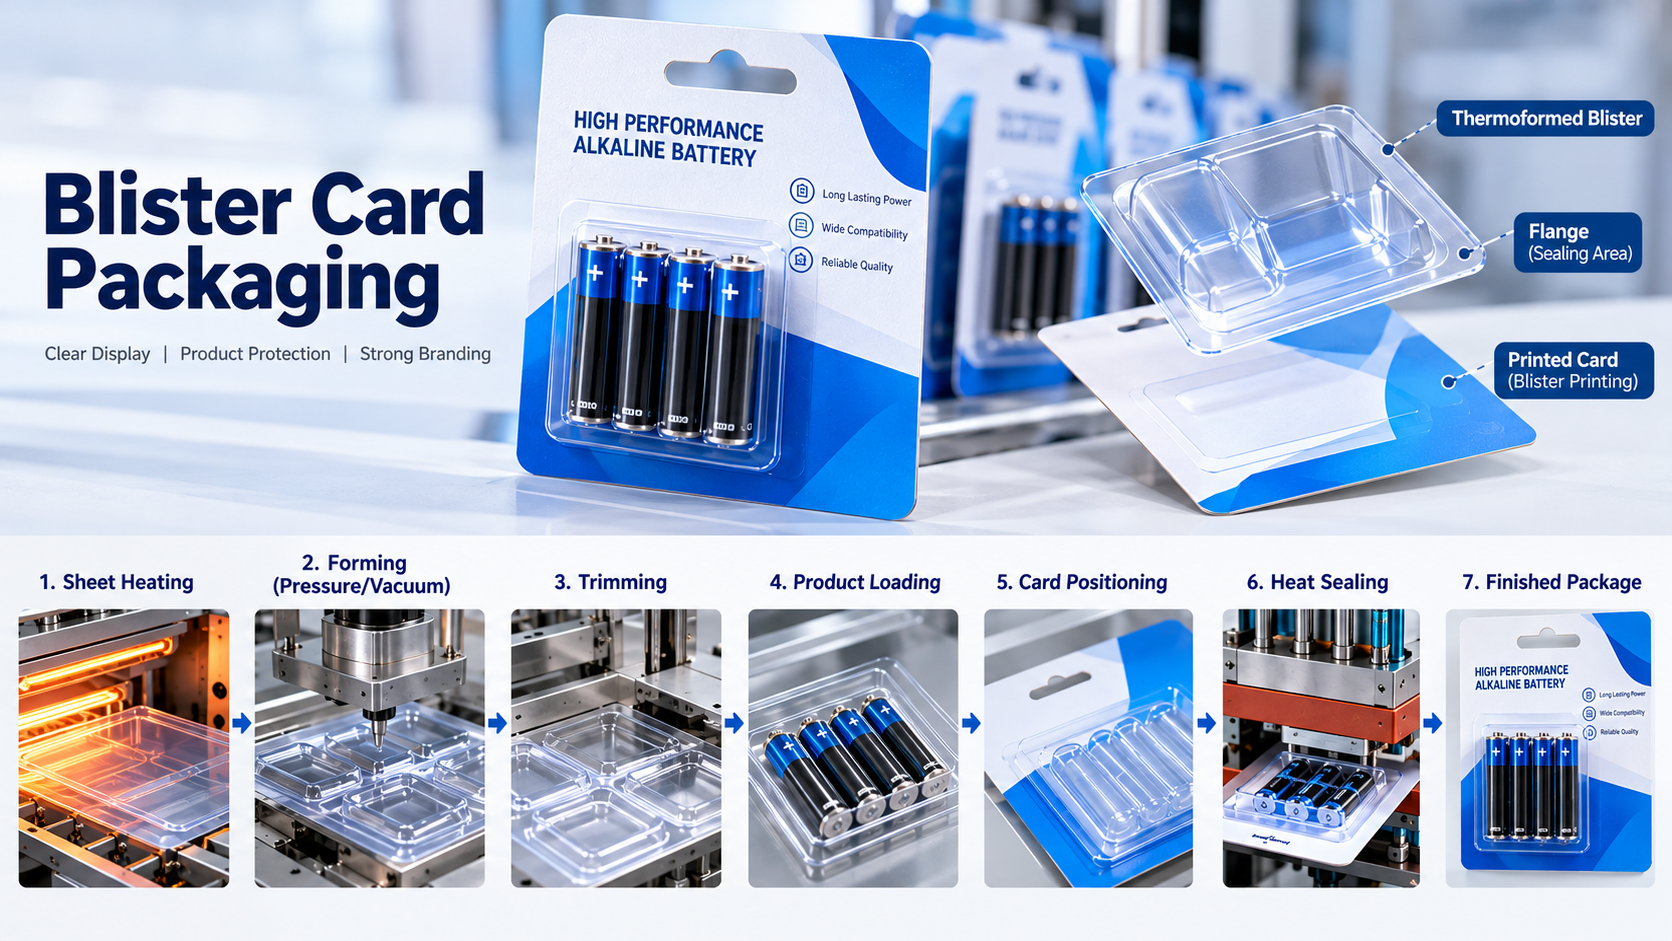
Blister card packaging combines a thermoformed plastic cavity with a printed backing card to display, protect and identify a product in a single retail package.
It is widely used for hardware, batteries, electronics accessories, tools, cosmetics, toys and other small consumer products because the clear blister keeps the product visible while the card provides space for branding, instructions, barcodes and product information.
Producing a reliable card-backed blister, however, requires more than forming clear plastic and placing it on printed board. The blister geometry, flange, plastic material, card construction, printing, heat-seal coating and sealing process must all be designed to work together.
A typical blister card package consists of two main components:
Thermoformed blister
A transparent or translucent plastic sheet is heated and formed into a cavity that holds the product.
Backing card
A printed paperboard card supports the blister and provides the primary surface for graphics and product information.
In a conventional face-seal package, the blister includes a flat flange around the cavity. This flange is bonded to a compatible coated area on the card.
The finished structure can therefore be simplified as:
Printed Card + Seal Layer + Thermoformed Blister + Product
This differs from a clamshell, where plastic normally surrounds the product on both sides.
Not every blister card uses exactly the same construction.
The thermoformed blister flange is sealed directly to a coated printed card.
This is one of the simplest card-backed blister structures and is widely used for relatively lightweight retail products.
The clear plastic extends across a larger area of the backing card.
This can create a different appearance and provide additional plastic support around the product.
The blister flange is positioned between two layers of paperboard rather than remaining exposed on the front surface.
This structure can provide a cleaner appearance and additional package rigidity.
The correct structure depends on product weight, desired security, card design, sealing method and retail presentation.
The design process should begin with the actual product rather than the card artwork.
First define:
Product dimensions and dimensional tolerance
Weight
Orientation in the package
Required product retention
Visibility requirements
Number of products per package
Retail hanging or standing requirements
Opening and tamper-evidence requirements
These factors determine the blister cavity and overall package dimensions.
A blister that is too tight may make product loading difficult, while an oversized cavity allows unnecessary product movement and increases package dimensions.
The blister should therefore provide sufficient manufacturing clearance without losing effective product retention.
Once the product position is defined, the plastic cavity can be developed.
Important features include:
Cavity dimensions
Forming depth
Corner radii
Draft
Product-retention features
Flange width
Trim line
Very deep or narrow cavities can stretch the heated sheet significantly, producing thinner areas in the finished blister.
Sharp corners can create similar problems because the plastic must stretch rapidly into a small area.
The blister should therefore be designed for both product presentation and thermoformability.
When developing a new package, cavity geometry should be reviewed together with the forming tool. MINGDU provides thermoforming mould solutions for forming and cutting applications, allowing the package geometry and production process to be considered together.
The flat area surrounding the blister cavity is usually called the flange.
For card-backed blister packaging, this area is especially important because it may provide:
The heat-sealing surface
Support during package assembly
Space for trimming
Structural stability around the cavity
The flange must be wide enough for the selected sealing process but should not be unnecessarily large.
Excessive flange width increases plastic use and overall package size. A flange that is too narrow may make alignment and sealing more difficult.
The flange and backing card therefore need to be designed together rather than as separate components.
Once the blister position and flange dimensions are established, the backing card can be laid out around them.
Typical card features include:
Product branding
Product name
Instructions
Safety information
Barcode or QR code
Hang hole
Promotional graphics
Regulatory information where required
The card must also provide enough clear area for the blister and sealing zone.
One important blister printing consideration is the relationship between artwork and sealing.
The sealing area experiences heat and pressure during package assembly. Important text, barcodes or fine graphics should therefore be positioned with the actual blister and sealing tooling in mind.
Artwork should also account for:
Die-cut tolerance
Hang-hole location
Blister position
Fold lines where applicable
Seal zone
Card edges
Good blister card design is therefore a combination of structural design and graphic design.
The backing card performs an important marketing function because it provides much more printable area than the transparent blister itself.
Depending on the product and card specification, printing may include:
Brand graphics
Product features
Installation instructions
Usage information
Product variants
Barcodes
Recycling information
But the printing and finishing system also has to remain compatible with downstream packaging operations.
The card supplier should understand that the board will be used for blister packaging so that printing, coating and heat-seal treatment can be specified together.
A visually attractive card that does not seal consistently is not a successful blister card.
Common thermoforming materials for retail blister applications include PET, PETG, PVC and, for selected applications, PP.
The correct material depends on:
| Requirement | What to Evaluate |
|---|---|
| Product visibility | Transparency and surface appearance |
| Cavity depth | Material formability |
| Package rigidity | Sheet stiffness and finished wall thickness |
| Sealing | Compatibility with card coating |
| Product protection | Impact and handling requirements |
| Sustainability goals | Resin choice and recycled-content options |
| Production | Heating and forming characteristics |
Material should never be selected based only on clarity or price.
For a broader comparison of thermoforming plastics, see the Thermoforming Materials Guide.
A typical manufacturing flow can be summarized as:
Plastic Sheet → Heating → Thermoforming → Cooling → Trimming → Product Loading → Card Positioning → Sealing → Inspection
The plastic blister and printed card may initially be manufactured through separate processes before being combined during final packaging.
Thermoplastic sheet is fed into the forming machine and heated until it reaches the appropriate forming condition.
The heated material is then shaped against the mold using vacuum, pressure or a combination of both.
The forming process needs to reproduce:
Cavity depth
Product-retention features
Corners
Flange geometry
Other functional details
For blister applications where controlled cavity definition and consistent forming are required, a Pressure and Vacuum Forming Machine can be evaluated according to the material, forming area, cavity geometry and production requirements.
After forming, the plastic must cool sufficiently before it is released from the mold.
Insufficient cooling may cause:
Distortion
Unstable dimensions
Warpage
Flange deformation
The objective is not simply to cool as quickly as possible. The forming and cooling cycle should produce a blister that remains dimensionally stable during trimming and sealing.
The formed blister is separated from the surrounding sheet according to the required package profile.
Trim accuracy is important because the finished flange must align correctly with the backing card and sealing tooling.
Poor trimming can create:
Uneven flange dimensions
Misalignment
Poor package appearance
Inconsistent sealing
Cavity layout and trim design should therefore be considered when developing the thermoforming mould and cutting tooling.
The card is printed separately according to the approved artwork and package layout.
Depending on the construction, card preparation can include:
Printing
Surface finishing
Application of heat-seal coating
Die cutting
Hang-hole punching
Scoring or folding
For heat-sealed blister cards, the coating must be compatible with the blister material and intended sealing conditions.
The card should also remain sufficiently flat for reliable automated or manual assembly.
The product is placed into the formed blister cavity.
Loading can be:
Manual
Semi-automatic
Automated
The appropriate method depends on production volume, product geometry and required output.
At this stage, the cavity must hold the product in the correct orientation while still allowing the backing card to sit properly against the flange.
The loaded blister is positioned against the backing card.
Accurate registration matters because the blister must align with:
Printed graphics
Card edges
Hang hole
Seal area
Cutting profile
A small registration error can become visually obvious when a transparent blister is positioned over a printed card.
For this reason, packaging artwork should always be developed from the final structural drawing rather than from approximate blister dimensions.
For a conventional heat-sealed card blister, the flange is pressed against the coated card under controlled conditions.
Three process variables are especially important:
Temperature + Pressure + Dwell Time
These variables must match the specific combination of:
plastic + card + heat-seal coating
Too little energy may create a weak or incomplete bond.
Too much heat can distort the plastic, damage the card surface or reduce package appearance.
The correct sealing window should therefore be established through material-supplier information and production trials rather than copied from an unrelated blister package.
Inspection should include both the formed blister and the completed card package.
Typical checks include:
Product positioning
Blister clarity
Cavity dimensions
Flange condition
Blister-to-card alignment
Seal continuity
Card flatness
Printing registration
Hang-hole position
Package appearance
A package may look correct immediately after sealing but still fail during transport or retail handling, so seal performance should also be validated under conditions relevant to the final product.
One of the most common mistakes in blister card packaging development is treating thermoforming and sealing as unrelated operations.
In reality, they are closely connected.
For example:
Poor flange flatness
→ inconsistent contact with the card
→ unstable sealing
Incorrect blister material
→ coating incompatibility
→ weak bond
Excessive forming distortion
→ card misalignment
→ poor appearance
Overly narrow flange
→ limited sealing area
→ reduced process tolerance
The package should therefore be engineered as:
Product → Blister → Flange → Card → Printing → Seal System → Production Equipment
rather than as separate plastic and paper components.
Equipment selection primarily concerns production of the plastic blister. Card printing and final sealing are usually separate or downstream operations unless the manufacturer uses a specially integrated packaging line.
For the thermoforming stage, evaluate:
Blister dimensions
Forming depth
Sheet material
Sheet thickness
Forming area
Number of cavities
Required detail
Trim method
Production volume
For high-output lightweight packaging, Thin-Gauge Thermoforming Machines are one production direction.
Where pressure and vacuum need to be combined to improve forming control or cavity definition, MINGDU's Pressure and Vacuum Forming Machines can be evaluated according to the actual blister design and production requirements.
The machine should ultimately be selected from the finished package drawing, plastic material, sheet specification, mold layout and required output, rather than from the term “blister packaging” alone.
Review:
Plastic and coating compatibility
Seal temperature
Pressure
Dwell time
Flange flatness
Card surface condition
Check the card construction, moisture condition, sealing temperature, dwell time and heat distribution.
Review structural drawings, artwork registration, card cutting tolerance and assembly positioning.
The forming material, blister wall thickness and seal temperature should be reviewed. Excessive heat exposure may distort the formed cavity or flange.
Check cavity clearance and product-retention geometry rather than simply reducing the overall cavity dimensions.
Before production, confirm:
Product dimensions and weight
Blister cavity geometry
Plastic material and thickness
Draft and corner radii
Flange dimensions
Card dimensions
Hang-hole location
Artwork position
Heat-seal coating
Seal area
Product loading method
Blister/card registration
Sealing conditions
Inspection requirements
Reviewing these factors before tooling and printing are finalized can prevent expensive changes later.
Blister card packaging combines a thermoformed plastic cavity with a printed paperboard backing card. The plastic holds and displays the product while the card provides branding, product information and structural support.
The card is typically printed, finished and die-cut separately from the thermoformed plastic blister. During final packaging, the product is loaded into the blister and the blister is aligned and attached to the card using the selected sealing or structural method.
Blister cards can carry branding, product information, instructions, warnings, barcodes, specifications and other retail information. Artwork must be positioned around the blister cavity, seal area, card edge and hang hole.
In a conventional face-seal blister, the plastic flange is bonded to a compatible heat-seal-coated card using controlled heat and pressure. Trapped blister designs use a different structure in which the flange is captured between card layers.
PET, PETG, PVC and PP can all be used for different blister applications. Selection depends on clarity, formability, rigidity, sealing compatibility, product requirements and recycling objectives.
The clear plastic blister in many card-backed packages is produced by thermoforming. The printed card is manufactured through a separate paperboard printing and converting process before both components are combined.
Successful blister card packaging depends on the connection between plastic forming and card sealing.
The blister must hold the product securely and form consistently. The flange must provide a usable sealing surface. The card must support graphics, retail display and the selected seal system. Printing and coating must remain compatible with final assembly.
The most reliable development sequence is therefore:
Product → Blister Design → Material → Mould → Card Layout → Printing → Forming → Loading → Sealing → Inspection
Considering these elements together makes it easier to achieve stable production, consistent package appearance and efficient material use.
For manufacturers developing thermoformed plastic blisters, MINGDU's Pressure and Vacuum Forming Machines can be evaluated according to the package geometry, plastic material, forming area and required production output.


