
Views: 0 Author: Site Editor Publish Time: 2026-11-19 Origin: Site
Atmos thermoforming plastic is a manufacturing method that heats a thermoplastic sheet until it softens. Then it shapes the sheet against a mold to create a solid, finished part. This post follows the full journey from flat sheet to trimmed product. It also shows how gauge, tooling, and material choices affect the result. Readers can use these details to judge whether this process fits their own project. The thermoforming steps stay easy to follow at every stage. Each section gives practical guidance for matching the method to real applications.
Thermoforming turns plastic sheets into useful parts by using heat, molds, and cooling.
Pick thin gauge for packaging, and pick heavy gauge for covers and panels that need to last.
Male molds work well for simple outside shapes; female molds give sharp detail on surfaces you can see.
Good design with draft angles and rounded corners stops thin walls and flaws.
Plan ahead and check your drawing to keep costs down and make the process go smoothly.
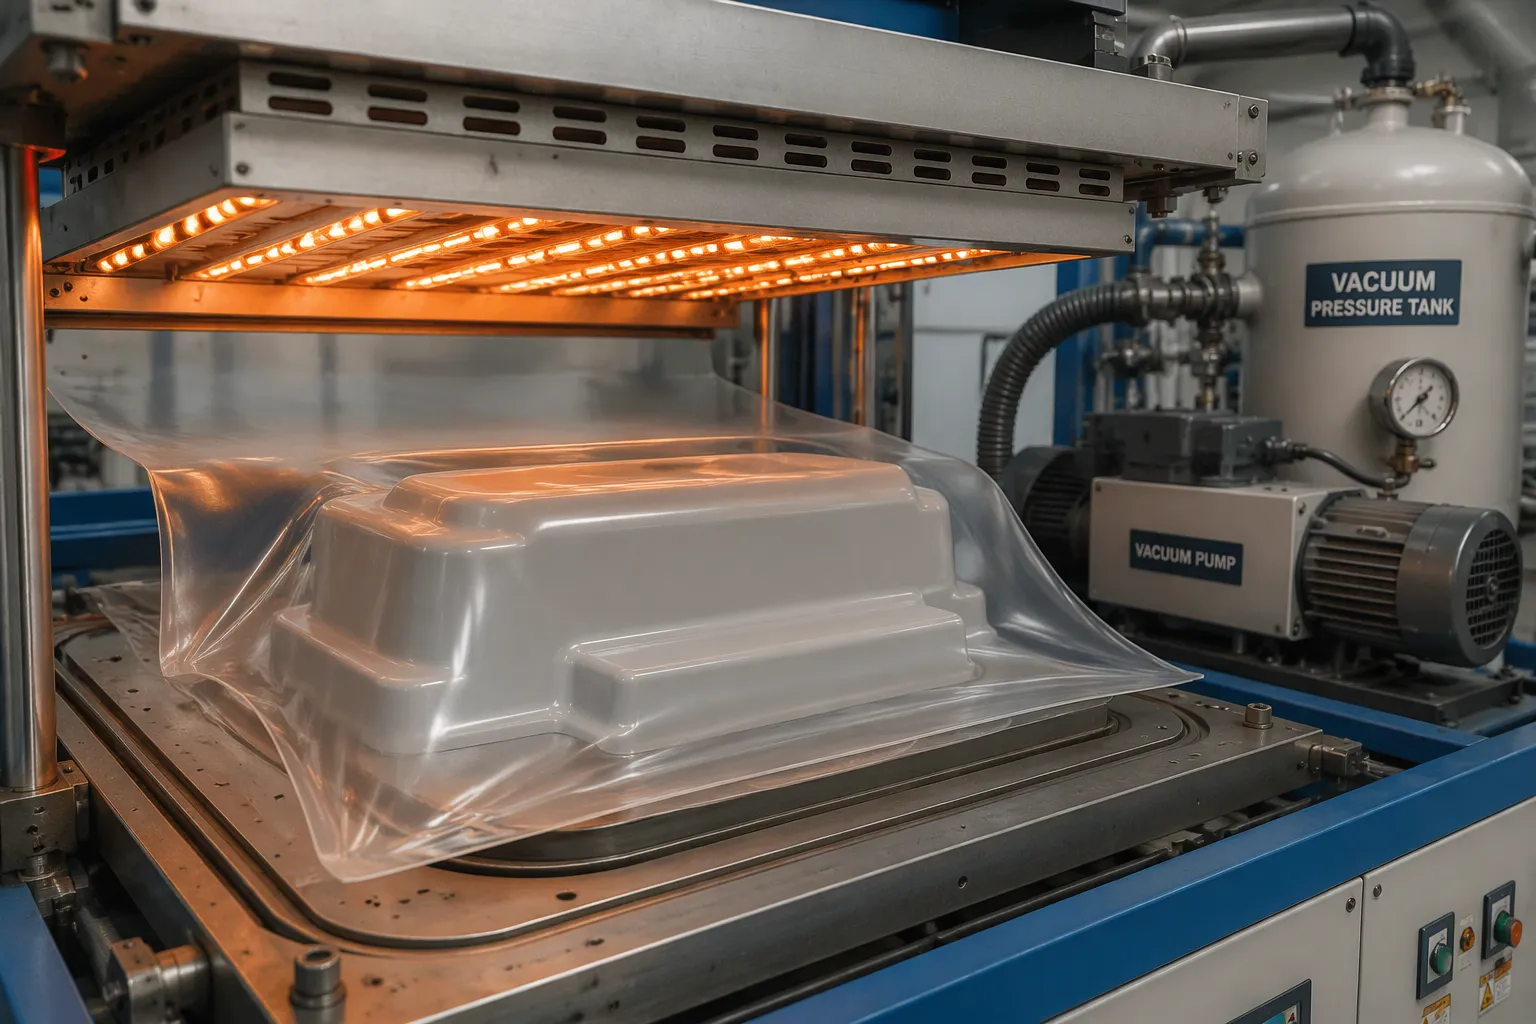
Atmos thermoforming plastic is a way to make things that heats a plastic sheet until it gets bendy. Then the process uses vacuum or pressure to pull or push the soft sheet onto a one-sided mold. Cooling makes the shape set, and the part keeps its form after it comes off. This method is part of the larger group of thermoforming techniques. Atmos thermoforming plastic is just one way to do that group of methods. It does not mean a separate material or a special chemistry. Instead, it means a thermoforming approach that uses the same basic steps as other forms of the craft.
Readers who ask what is thermoforming will find the answer in this basic order. A flat plastic sheet gets soft under heat, takes the mold's shape, and cools into a solid part. The process works with many thermoplastics, and each material has its own forming temperature and cooling behavior. The mold is on one side only, so the process stays simpler and often costs less than methods that need two matching tool halves.
Vacuum forming is the most common type of thermoforming. It uses a vacuum to pull the heated sheet against the mold surface. Pressure forming is a different method. It differs in how force is applied, using positive air pressure to press the sheet into the mold. Both methods use the same idea of heat, form, and cool. The choice between them depends on the detail and surface finish a part needs.
This approach fits projects that need strong parts without the cost of two-sided tooling. Trays, covers, and housings all work well with the process. The method handles large parts and small parts alike. It also works across a range of gauges, from thin packaging to heavy-gauge industrial components. Designers choose among different types of thermoforming based on part size, quantity, and the level of detail they need.
The process works for both low-volume runs and steady production. Tooling costs stay lower than many other methods, and lead times are often shorter. A single mold can make many identical parts once the setup is done. The method also allows for quick changes when a design evolves.
Matched mold forming is another option in the wider family, and it uses two tool halves to press the sheet from both sides. Each thermoforming technique has a place, and the right choice depends on the job. For many projects, the one-sided approach offers a strong balance of cost, speed, and part quality. Teams that understand these trade-offs can match the method to their application with confidence.

The thermoforming process follows a set order of steps. Each step builds on the one before it. Skipping a step causes defects that show up later.
Material selection: the team picks a thermoplastic grade that fits the part's strength, appearance, and service conditions.
Clamping: the plastic sheet moves into a frame that holds its edges tight.
Heating: ovens raise the sheet to its forming temperature until it turns soft and bendable.
Forming: air pressure or a vacuum pushes the soft sheet against the tool.
Cooling: the part stays on the tool until the plastic gets stiff.
Release: the part lifts off the tool.
Trimming: cutters remove extra sheet material after the part has cooled.
Finishing: the part gets any needed holes, coatings, or assembly work.
Heating a plastic sheet evenly matters most in this sequence. Hot spots and cold spots both cause thin walls or webbing. The thermoforming process also depends on fast forming after the heat cycle. A sheet that cools before it touches the tool will not hold fine detail.
The two main methods differ in how they apply force to the heated plastic sheet. Vacuum forming uses negative pressure. Air escapes through small holes in the tool, and outside air pushes the sheet down onto the surface. Pressure forming uses positive pressure. Compressed air drives the sheet into the cavity from above.
Feature |
Vacuum Forming |
Pressure Forming |
|---|---|---|
Force source |
Vacuum pulls air out |
Compressed air pushes in |
Detail level |
Good for simple shapes |
Sharper edges and crisper texture |
Tool cost |
Lower |
Higher |
Best fit |
Trays, covers, large panels |
Housings with fine features |
The comparison of vacuum forming vs. pressure forming comes down to detail and budget. Vacuum forming suits parts with gentle curves and modest texture. Pressure forming and vacuum forming both shape the same thermoplastics, yet pressure forming reaches tighter corners. Teams weighing vacuum forming vs. pressure forming should match the choice to the drawing. Simple shapes favor vacuum. Fine lettering or molded-in texture favors pressure.
Both methods share the same core idea: shaping it over a mold with heat and force. The process stays one-sided in each case, and both rely on the same cooling and trimming steps. A shop that runs both can move a job between them as the design changes. That flexibility keeps the thermoforming process efficient across a mixed product line.
The tool you pick decides how the outside and inside of each part will look. A male tool, also called a positive mold, holds the part shape as a raised form. The heated sheet of thin plastic drapes over this form, so the outer surface picks up the tool's texture. Male tools work well for parts with simple outer shapes, like covers and panels. They also often cost less to build.
A female tool, or negative mold, holds the shape as a cavity. The sheet pulls into the cavity, and the inner surface copies the tool. Female tools give sharp detail on the visible side and work well for trays and containers. Shops choose between these molds based on which surface needs the sharper finish. Deep draws often work better with female tools, while shallow parts often work better with male tools.
Gauge means the thickness of the starting sheet. Thin gauge stock makes lightweight parts, like packaging, cups, and disposable trays. These parts form fast, and the process runs at high speed. Heavy gauge stock makes thicker, stiffer parts, like equipment covers, machine housings, and large panels. Heavy gauge parts need longer heat cycles and stronger tooling.
The gauge also decides the trimming method and the handling needs. Thin parts often trim in line with the forming step. Heavy parts usually trim as a separate operation after cooling. Teams match gauge to the duty the part must handle.
Many thermoplastics work in this process. Common thermoforming materials include ABS, polystyrene, polypropylene, polyethylene, PETG, and polycarbonate. These thermoplastic materials cover a wide range of strength, clarity, and heat resistance. Thermoforming materials also include acrylic and PVC for specific needs. The best choice depends on the service conditions and the budget. Skilled teams weigh these thermoforming techniques against the job at hand.
Good plastic thermoforming design begins with a few simple rules. Draft angles let the part come off the mold without scraping. A slight taper on every vertical wall helps the part lift off cleanly. Sharp corners make thin walls and weak spots, so rounded corners keep the material flow even. Designers also check the draw ratio, which compares part depth to opening width. A deep draw stretches the sheet thin at the bottom, so shallow shapes keep wall thickness better.
Undercuts need special care. A feature that locks the part onto the tool will not come off without a moving insert or a second cut. Teams often redesign undercuts as separate pieces or trim them after forming. These thermoforming techniques keep tooling simple and parts consistent. A design review early in the project saves rework later.
Several things drive the cost of a thermoforming project. Material choice comes first, since resin prices vary a lot across thermoplastics. Tooling comes next. A single mold costs less than a matched set, and simple shapes cost less than detailed ones. Gauge matters too, because heavy sheet needs longer heat cycles and stronger frames. Part size raises cost as the sheet and oven grow. Finishing adds labor for trimming, coating, and assembly.
Smart teams balance these drivers against the job. A larger part in thin gauge may cost less than a small part in heavy gauge. The process rewards early planning. Buyers who share their drawing and volume early get a clearer picture of where the money goes. Thermoforming materials, molds, and finishing all interact, so no single factor tells the whole story.
Thermoforming is used to make many everyday products. Packaging trays, clamshells, and blister packs are common in stores and shipping. Equipment covers and machine housings protect motors, electronics, and control panels. Medical trays, car interior panels, and store displays also use this method. Each product needs a different mix of gauge, tooling, and material.
A thin-gauge food tray needs fast cycles and low tool cost. A heavy-gauge equipment cover needs stiffness, a clean outer surface, and a strong mold. A clear display part needs a material with good clarity and a female tool that holds sharp detail. Readers can list their own part's job, size, and appearance needs. That short list points toward the right setup.
Matching gauge, tooling, and material to the application starts with three questions. How thick must the part be? Which surface must look best? How many parts will the run make? Thin gauge works well for high-volume packaging. Heavy gauge works well for durable covers and panels. A male tool is good for simple outer shapes, and a female tool is good for crisp visible detail.
Material choice follows the service conditions. A part that faces heat, impact, or chemicals needs a resin that can handle those demands. Teams should check the draw ratio and draft angles before cutting any molds. Early checks on the thermoforming design keep tooling simple and parts consistent. A shop that reviews the drawing first can spot trouble before the process begins.
With gauge, tooling, and material settled, the path from sheet to finished part becomes clear. The next step turns that plan into a quote and a production schedule.
The trip from a flat sheet to a finished part follows a clear path. A shop heats the thermoplastic sheet, forms it against a one-sided mold, cools the part, and trims the extra material. This thermoforming process turns a simple sheet into a solid, useful product.
Readers can match gauge, tooling, and material to their own project with a few simple checks. Thin gauge works well for packaging, and heavy gauge works well for durable covers. Male tools are good for simple outer shapes, and female tools hold sharp detail. Atmos thermoforming plastic pays off when you plan early, so teams should review the drawing before cutting any mold. Contact the team today for a quote or a design review.
The price depends on the material, tooling, gauge, part size, and finishing. One mold costs less than a matched set. Thick sheet needs longer heat cycles and stronger frames. Buyers who share a drawing and volume early get a clearer cost picture.
One mold works well for one shape family. Simple curves and modest texture work with a basic tool. Fine lettering or molded-in texture needs a pressure setup and a tool built for sharper detail. Teams should match the tool to the drawing before cutting metal.
They keep the draw ratio modest and add rounded corners. A deep draw stretches the sheet thin at the bottom. Draft angles on every vertical wall help the part come off cleanly. An early design review catches these issues before tooling begins.
Common choices include ABS, polystyrene, polypropylene, polyethylene, PETG, and polycarbonate. Acrylic and PVC cover specific needs. The right pick depends on heat, impact, and chemical exposure, plus the budget. Each resin has its own forming temperature and cooling behavior.
Pick pressure forming when the part needs sharp edges or crisp texture. Vacuum forming suits trays, covers, and large panels with gentle curves. Both share the same cooling and trimming steps. The choice comes down to detail level and tool budget.


